Published a new version of SPP: https://play.google.com/store/apps/details?id=com.kaytat.simpleprotocolplayer
This version adds audio ducking so that the streaming continues even if there some phone notification, like a text message.
Published a new version of SPP: https://play.google.com/store/apps/details?id=com.kaytat.simpleprotocolplayer
This version adds audio ducking so that the streaming continues even if there some phone notification, like a text message.
I have posted a simple protocol server for Windows on GitHub: https://github.com/kaytat/SimpleProtocolServer
There is more technical info in the README of that project.
The server will probably require a little configuration from the user. The reason is the WSAPI loopback used for capture does not allow for programmatically changing the sampling rate. Since the SPP player requires a certain format, the user will have to set the properties of the playback device to match.
Here are the steps to do so for a Win7 machine. First open up the “Playback devices” from the system tray.

Choose the “Properties” button of the sound card being used:

Choose the format the best fits SPP. SPP defaults to 16bit 44.1kHz, but it will also support 16bit 48kHz.

A corresponding update to SPP has been posted on the Play Store that adds an option to choose either 44.1kHz or 48kHz for the sampling rate.
I published my first Android app and it’s called the Simple Protocol Player. I probably should have spent more time thinking up a better name.
Here are some docs.
And the Play Store Link.
I had the auto-update for raspbmc turned off so I decided to update. The UI performs much better with this version. I did have some more remote issues. The “back” button and “i/more” button on the remote didn’t work anymore.
The fix was to update the XML files related to the remote.
First .xbmc/userdata/Lircmap.xml
<lircmap>
  <remote device="devinput">
    <back>KEY_ESC</back>
    <info>KEY_COMPOSE</info>
    <star>KEY_SUBTITLE</star>
    <play>KEY_PLAYPAUSE</play>
  </remote>
</lircmap>
And then .xbmc/userdata/keymaps/keyboard.xml
<keymap>
  <global>
    <remote>
      <star>contextmenu</star>
    </remote>
  </global>
</keymap>
This maps:
I like the idea of virtual desktops and it’s a nice tool, but what I really wanted to do was to start a completely separate X session on my Ubuntu box. A bit of googling suggested that I create a separate user account (so that the two X sessions don’t conflict with eachother) and that I run the X session on a different terminal from where the X session was launched.
So I did that. I created a test account, hit CONTROL-ALT-F4 to get to the terminal, logged in with my newly created account, and ran this command to start the new X session:
startx /usr/bin/gnome-session -- :1 vt5
And that seemed to go fine but all that gave me was this blank Ubuntu screen on terminal 5:

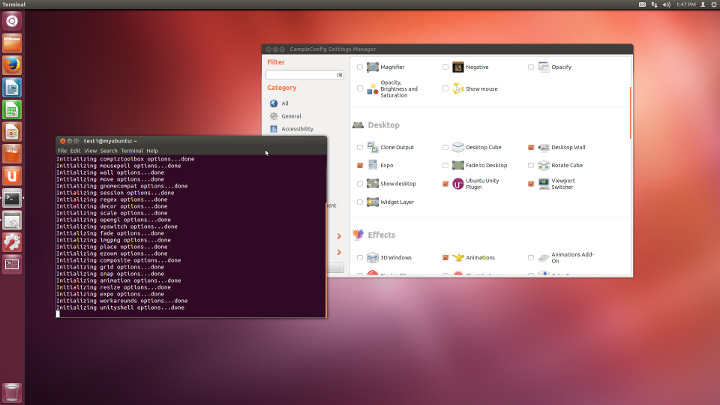
So close, yet so far. After playing around, I found that to start the whole Unity experience, I needed to enable the Unity plugin in compiz. So, I hit CONTROL-ALT-T to bring up a terminal:

And from the command prompt ran:
ccsm &
And then clicked the check box next to “Ubuntu Unity Plugin”:
Nice. The gnome session fallback is easier to setup since that doesn’t use compiz and the whole UI starts immediately:
startx /usr/bin/gnome-session-fallback -- :1 vt5
I didn’t know that repo (http://code.google.com/p/git-repo/ and https://gerrit.googlesource.com/git-repo/) wasn’t supported on Windows.
I guess that makes sense since repo is meant to be used in the context of Android.
But I kinda like the fact that repo can manage multiple git repos so I hacked the code to make it BARELY run on Windows.
Check it out: https://github.com/kaytat
I found recently that I didn’t hear any audio from HDMI. Googling revealed this: http://www.raspberrypi.org/phpBB3/viewtopic.php?t=5062
Following those tips, I ssh’ed into the rpi and did this:
sudo nano /boot/config.txt
And added this at the end:
hdmi_drive=2
Then hit control-o to write out the file, control-x to exit, and reboot.
I remember having done this before and I realized my previous change was probably overwritten by a recent auto-update. So just in case, I disabled the auto-update feature from “Programs->Raspbmc Settings”.
A quick comment on the raspbmc forums resulted in a fix and now the remote works out of the box!

Another update, another battle with the remote.

I did all the usual stuff, as mentioned in the previous posts.
Nothing.
Looking at the logs, it turns out all this module stuff is already built into the most recent kernel. I even see the tell-tale “fixing aureal” message in dmesg. I added the changes to /etc/rc.local, but no success. Only the mouse worked.
After a bunch of trial and error, I think there’s some sort of conflict between lirc and eventlirc. Only after I started killing a bunch of lircd processes did the remote start sputtering to life.
My fix right now? Yet another “what am I doing?” hack. Here it goes. Start from a fresh build/image.
ssh into your raspberry pi using putty
# sudo nano /lib/udev/lircd_helper
This will bring up an editor. Skip the first bunch of lines that start with #.
Right before you see
logger -t "lircd_helper" ACTION ${ACTION}
add the following
# I don't know why this works.  It just does.
logger -t "lircd_helper" Crash and burn.
exit 1;

logger -t "lircd_helper" ACTION ${ACTION}
To exit, the editor, hit control-o (to write the file) and then control-x to exit. And reboot. No custom kernel. No downloading headers. None of that. Just a hack to stop lircd from running.
All this does is prevent lircd from running. This seems to allow eventlircd to run. Which seems to be the key.
This is how I feel:

… a little bit Pacquiou and a little bit Marquez …